Pages

Wednesday, March 5, 2014

Walls n such

This is just a quick part two of the terrain project. This time the ever popular linear obstacles, a main stay of seemingly any gaming terrain. Plus a ruined building.

With a lot more power tooling of 6mm MDF board the bases for the walls and hedges were produced. It may be very easy to create a wall from a strip of something but the key is basing it well enough to not break or warp. I set about building three styles of obstacle; rough stone wall, hedge, and a dressed wall with posts to match the building.

Suddenly pictures...

Chunky bases. Shallower bevel than previous pieces due to the shape.
Foamboard and balsa wood construction.
Strips cut from aero board and green scourer at work here.
Feasible set up, Scars of Caen scorched nobles estate?
Detailing for building and filler underway. Floorboards are are coffee stirrers.
Front step tiles are cut from GW custom movement tray.
Balsa wood works so well for many things, the broken corner supports make use of the natural wood appearance.
After two coats of a rough filler mix, the effect of the walls seems to work well.
Painting and flocking almost complete.


Monday, February 24, 2014

New year, new projects!

Here ends another lengthy hiatus for The Mini Kingdom blog! No serious reason, just a combination of things. No need to bore you with the details. But now that 2014 has been spinning it wheels for a little while it's well and truly ready to motor on.

I have a great number of projects underway and commissions ongoing, perhaps more than I can chew. But as I get back into the blogging swing I will certainly be sharing as much as possible. Partly due to this rather shiny new iPad Air, which eases the process no end!

So first up for the year is terrain. I have dropped a few pictures on my Facebook, now for a few more.

Looking to involve myself with my local game store and the avid Warmachine/Hordes community. I have volunteered myself to construct some terrain to enhance the gaming at the store and local events. I didn't have the funds for materials myself but the urge to build stuff is strong.

After rifling all the hardware, craft, models stores I could find, most of what I needed was gathered. MDF boards, foamcard, mounting card, fillers, sand, paints, glue, assorted balsa wood, and aero board (handy polystyrene boards in usable thicknesses). Lastly not forgetting the holy grail of terrain building PINK FOAM, aka "extruded polystyrene", "XPS". This seems near impossible to source in Ireland but I was lucky on this occasion with winter stock. Although, it was only available in a hefty 60mm thickness I could not pass it up

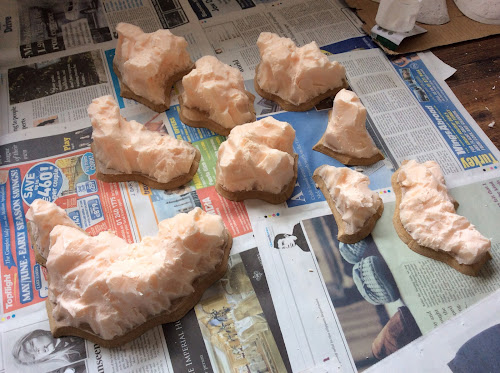
Much power tooling ensued, followed by hacking up the pink foam.

With this basic structure work done I took some time to coat the pieces in a mix of PVA/filler/masonry paint to give them a robust surface for gaming. Once this was done they were painted over a few stages with mixes of poster paint. Lastly with the flock scatter glued and set this was heavily coated in watered down PVA, again to ensure robustness.

To conclude this lengthy post; the first of my buildings for this project, which is shown below in its 20mm prototype form. Next post I should have the "full scale" version complete to show you.


Friday, October 18, 2013

Zombicide: TCM - up close!

Thought I'd upload some up close individual shots of the characters from Toxic City Mall since it's quite hard to see them in the group photos in the previous post.

Characters from Season 1 - their Zombivor versions:


New characters from TCM:


Thursday, October 17, 2013

Chaos Space Marine Terminators with bunny ears!

Here's a little side project I've been working on over the past month or so, as I can only handle so many elves before I go mad!

Five Chaos Space Marine Terminators with their Lord have all been painted to a high-gaming standard in the Khornate style as well as been converted with some funky Khornate bunny ears.


If anyone's interested they're now available on eBay.


Season 2 of Zombicide! Well sort of...

Unfortunately, like a lot of Zombicide backers, we still haven't received our pledge package yet. However, one of lucky clients in the UK did receive Toxic City Mall and sent them straight over to be painted. And here they are all completed!


We went with a bright green "toxic" effect for the zombies which is quite distinctive and lends well to the theme of the new expansion. They'll be no worries trying to tell the normal painted zombies and these new ones apart!

For the Survivors, it was business as usual - make them look good and grungy! And if they were of the female variety, hand them over to the wife so she can do her finishing touches on their faces. Seriously I don't get how she can do the make-up so well. The treatment for the Zombivors was much of the same, except add in some more gruesome blood effects and give them a deranged look in their eyes.


Keeping our fingers crossed we get our zombies and get them all painted up so we can feature them on the blog for you soon! But in the meantime enjoy these photos. :)


Saturday, September 7, 2013

Beastmen Army For Sale - Converted


Beastmen Army for sale. The models have been painted and converted to a high-gaming standard. And include the following:


2 x 10 Ungor
1 x 20 Bestigor
1 x 32 Gor + 1 (4 base) unit filler diorama + extra standard bearer and musician
2 x Fully converted Gor chariot - featuring customized orc chariot body, new orc boars, and converted Gor and Bestigor crew
1 x converted Razorgor - filled out new orc boar with oop GW black dragon horns
1 x Beastlord - converted weapons and horns

Available on eBay or contact me to arrange a private sale via paypal.


Tuesday, September 3, 2013

Dystopian Wars - Russian Coalition: Commission

I've done a couple of the Russian Coalition models before but this time around it was great to get a whole desk full of them, which you can see in the photo to the right.

Here they are in their first prep phase - drying under the lamps after being cleaned with a bit of warm water with a small touch of washing up liquid. This gets rid of any greasy residue from the residue - mind Spartan Games models are pretty clean anyway, but it's not worth the risk to avoid this step.

Getting them dry is a little bit more effort, but I just use a combination of blowing off the water droplets, carefully patting the models with some absorbent kitchen paper and air drying them under daylight lamps.


I've spoken before about the quality of Dystopian Wars and these are no exception: great casts, a whole lot of detail and a lot of model for your money - and I envy anyone getting a huge force like this to the gaming table.


I've recently switched from the over-priced and unreliable GW Citadel Chaos Black to Army Painter Matt Black for undercoating and so far the results have been far superior - a smooth effortless coat with no second pass or touch up required. After this experience I have no intention to using GW sprays ever again. If you're thinking of switching check out this blog post comparing the two: GW Chaos Black vs AP Matt Black.


For this commission, my client wanted me to use the painting palette I had used previously and here's a quick rundown of what I used:

Foundry Paints:
Arctic Grey Palette  __________  __________  __________
Forest Green Palette  __________  __________  __________
Sky Blue Palette  __________  __________  __________

P3 Metallics:
Pig Iron  __________
Cold Steel  __________
Molten Bronze  __________
Gun Corp Brown  __________

Army Painter:
Strong Tone ink (ink wash)    __________


Forgot to mention, all the guns are magnetised too - I really do love magnetising stuff!

Now onto the photos - Enjoy :)