Pages

Showing posts with label WWII. Show all posts

Thursday, August 1, 2013

Dust Tactics - Commission

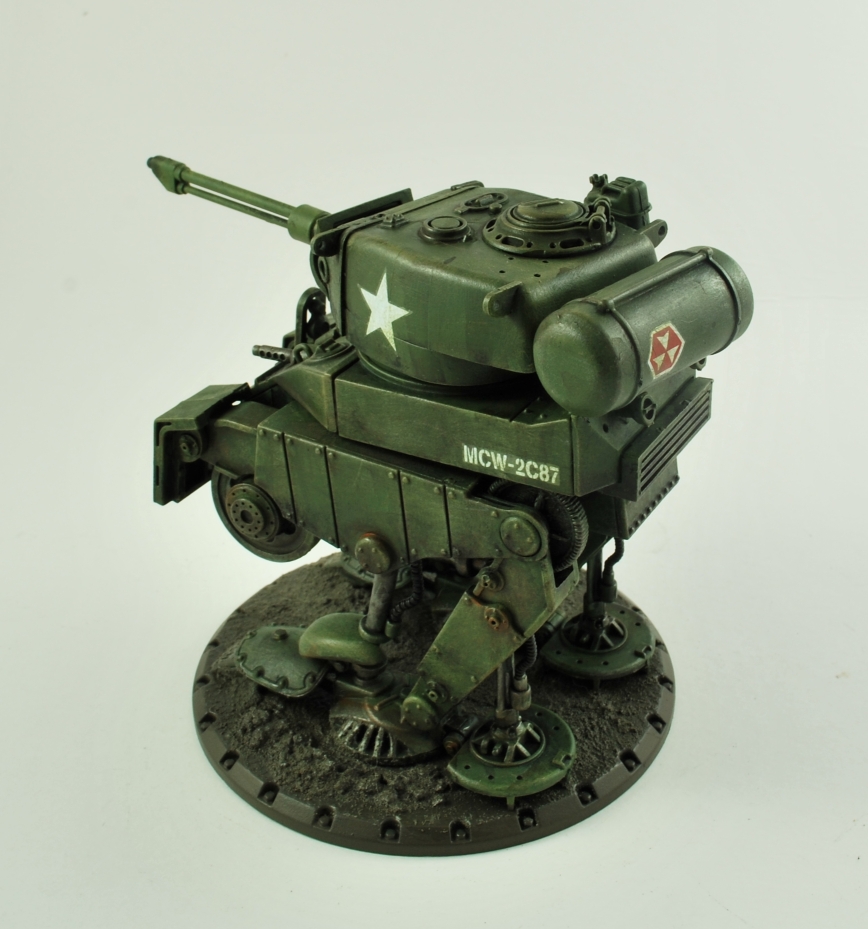
Time for Dust Tactics! Another great opportunity to get my paws on a host of new and interesting models. I am certainly partial to anything WWII related so it was cool to get a look at these models first hand.

I will say that despite the medium consistency of the plastic used on the infantry (and a few slightly flaccid weapons) the detail on them is pretty good. The plastic for the vehicles, by comparison, is solid.

The goal for this paint scheme was leaning towards more historically accurate colours and weathered realism. For the axis uniforms and weapons I incorporated a number of Vallejo's German specific paints I had, namely German Fieldgrey WWII, and German Camo Dark Green. The Foundry palette Drab was used for the Allied uniforms. The Axis vehicles were base coated Vallejo Black Grey, with Foundry Phlegm Green Shade for the allies. These were weathered up in many stages with a combination of dry-brushing and inks.

The basing for all the models involves Vallejo Dark Earth Paste and a little ink plus water effect applied. The final touches were squad markings for the Allied troops and all the markings for the vehicles which are from the official Dust transfer sheets (available from Dust Game - super quick delivery from the US! Or alternatively if you were just after the stars and crosses, and none of the vehicle designation or extras, you could use the Bolt Action decals available from Warlord Games).

Plenty of impressive models are still being released for Dust Tactics/Warfare following its switch from Fantasy Flight to Battlefront/Gale Force 9. It will be interesting to see where they take things. We shall also see if I get the chance to paint any further Dust stuff. If I do, you will be sure to see it here!

The Walkers: Axis

Ludwig

Luther

Hans


The Walkers: Allies

Pounder


Hot Dog
Steel Rain

Black Hawk
Wild Fire


Troops: Axis


Troops: Allies


Sunday, March 17, 2013

Flames of War Finished.

Flames of War, Open Fire, Infantry and Guns (boxed set plastics).

This is the contents of the Open Fire boxed set all painting up, except for the tanks. Given the scale, these models are insanely detailed and accurate. They have elements shown on every model that are often missed on larger scales, such as the correct ammo pouches and equipment. 

In truth they have been fully painted for a couple of weeks. Finally finished the basing, making them Ebay ready for later today. I was seeking a more subtle and realistic terrain effect than these models being waist high in clumped static grass. In this case they are based with Vallejo 'Flat Earth; paste, followed by patchy flock and a little inked water effect. You could go a whole lot darker, wetter and muddier with this combination but for now this is a sensible start.

...and yes the Paratroopers aren't painted Olive Drab but I cant resist the faded and dusky Khaki look Hollywood has fed us.

Anyhow here we have the US Paratrooper Platoon, and the German Panzer-grenadier company with supporting Pak40 anti tank guns from  Battlefront Miniatures 'Open Fire' boxed set.


Panzer-grenadier company HQ
Panzer-grenadier Platoon 1
Panzer-grenadier Platoon 2
7.5 cm  Panzerabwehrkanones (Pak 40's) 
US Paratrooper HQ
US Paratrooper Platoon

Wednesday, January 30, 2013

Flames of War, Open Fire painting progress.

Plenty of models to paint in this boxed set. Once all constructed I set about painted the German forces first, these were the paints I had easily at hand at and a colour scheme I have already been painting in current months. This was also the majority of models to be painted and a good chunk to finish first.

German forces - Open Fire
Allied forces - Open Fire
I have quickly discovered that painting these infantry in their full detail is comparable to painting a force of this many individuals in any scale. That is 85 models in this case. These plastics are very well detailed and contain far more accuracy and attention to details than many other larger scaled kits.

My first concern was whether to affix all models to the bases or not. I had seen all infantry affixed in a line to something else to ease painting. I decided to glue most of the models to the bases and only keep key models separate, those which severely hampered access to the other models on the base. This made handling and storing the models easily without much risk of losing individual men.

QUICK TIP: To affix the separate models to the bases temporarily I used Pritt Stick, simply applied to the bottom of the round base. This was secure enough for handling the infantry base and for most paint application. Even when dried the model can be easily lifted off. When ready, scrap of any excess and the model will stick done correctly with plastic glue as always.

Uniforms under way, two models not glued permanently.
Note, before starting any base colours I inked all models over a white undercoat, Devlan Mud naturally. This not only helped emphasize all details on the flat white model (I can not imagine trying to see these details on black) it also creates a subtle natural shadow for each colour applied afterwards.


Now with the base colours, listed below for comparison or anyone's interest. Camo patterns, mettalics and highlighting yet to come.


Infantry

Vallejo - German Fieldgrey : Uniform.
Foundry - Buff Leather Shade: Camo smocks/helmet covers, panzerfaust/schrecks.
Foundry - Deep Brown Leather Shade: Webbing, weapon straps, pouches, holsters, boots .
Foundry - Butter Fudge: Skin.
Vallejo - German Camo, Drak Green: Helmets, gasmask canister.
Vallejo - Flat Earth: Flask cover.
Vallejo - German Camo, Beige: Bread bag, ankle wraps.
Foundry - Bay Brown: (All wood) Weapon stocks, trenching tool/stick grenade handles.
Vallejo - Black Grey: (All metals & misc) Rifles barrels, pistols, machine guns, grenades, spade, flask top, ammo boxes, Officers jack boots, binoculars, radio.

Stug's & PaK40's

1) Foundry - Bay Brown
2) Foundry - Deep Brown Leather Shade: Heavily dry brushed

Thursday, January 24, 2013

Flames of War, Open Fire, Sherman fixes.


Battlefronts' Flames of War - Open Fire boxed set is quite an awesome box of toys. However currently there are a couple of awkward problems with the construction of the allied Shermans included in this set, as any who have tried to build them has attested on many forums.

But these problems can be fixed relatively easily. At least the models from my box were fixed like this, I hope that it is helpful for all.

Lets start with the main issue. The right hand track piece on every Sherman tank will be crooked, resulting in a tank that leans at best (If you glue and physically vice grip the model in your hands in two places until securely welded) and has ugly gaps in many places. Never fear with one easy step this can all be resolved!

Here we have the 4 main components, we will only need to fix the left most piece shown here.
To fix simple cut away the part shown. Ultimately this will not hamper the construction, you can leave a cm of the front portion to ensure a solid model.
Easy as that. This tab/shelf sits on (and can be glued to) the top edge of the lower hull component, but it angles downwards by a fraction at the rear of the model. When the components are put together this will very firmly push all other pieces out of alignment. Thankfully, with this removed the models fit together perfectly!

Before
After
Wham, bam, Shermann. 6 new top notch and squared up Sherman hulls built in minutes.
One other small problem involves the Turret magnet placement for the Sherman Firefly, this is a far smaller issue and readily fixed in many manners. I wanted a nice secure housing for the magnet to be glued in. The remedy was found on the sprue themselves. The regular Sherman open hatch piece will fit the magnet almost perfectly inside. So I clipped off the hatches, sat the magnet inside and filed down the top of the hatch. This can be a little work, unless you have a decent side file at hand (working the fiddly piece against the file will be considerably easier than visa versa).


Completing construction of the magnetized turret at this point involves a number of careful and patient steps.

1) Super glue the magnets into the housing as shown above and into the turret. (obviously with the correct polarities for affixing turret to hull)
2) Allow time to dry securely. (Dependant on your Super glue)
3)When dry, let the magnets snap together and cover the bottom of the hatch piece with plastic glue.
4) Place the turret firmly and squarely into position.
5) Allow time to dry securely. (This time will be the welding of plastic so I would leave for 20-30 minutes)

These step will ensure the turret is level and perfectly placed. Simply gluing the hatch piece to the hull can inevitably result in wonky turrets.

On last general construction tip (This may already be a standard method, but seems fitting to add it here).
After avoiding wonky turrets, its time to avoid wonky barrels. I initially found gluing the barrels for the Shermans rather tricky, especially if you try to glue these to the turret with the mantlet attached. So the last quick tip is gluing the barrel to the outer mantlet separately while it is flat on the desk/cutting mat as shown below. This allows the barrels to be placed firmly and as straight as can be. Once all dry fixing this to the turret is a doddle.

A wild doddle appears!
Stug Fodder.

Sunday, December 30, 2012

Bolt Action Panzer-grenadier platoon progress

Just a quick photo spam for the progress on this almost completed Bolt Action 28mm project, including the MG team conversions 


Converted MG teams

MG32 arms from Halftrack sprue, loaders arms from Wargames Factory sprue.


Vehicle 215 was knocked out of commission in the previous days engagement (Thats my story anyway, nothing to do with the destruction of a number 5 on the transfer sheet). Note that the red numbering is a separately purchased transfer sheet, not included in the Panzer-grenadier box set.