Pages

Monday, April 29, 2013

Super Dungeon Explore

This is a game that intrigued me from the get go with its super stylized characters and monsters. Love it or hate it, the chibi style of characterisation always puts a fun and endearing twist on its subject matter and in the case of a dungeon crawler board game a much needed breath of fresh air. Of course, any big box of miniatures is expensive and I had never had the opportunity to get my hands on these models before now. So when I saw the release of the latest expansion with perhaps the best set models that had been produced I went ahead with the investment.

Preparation

The models for Super Dungeon Explore come pre-assembled. This is a benefit for most purchasers but can make the removal of mould lines a little trickier and clean up on these models is already tricky given the material they are produced in. The softer, waxy plastic can not be filed away and use of a knife can easily dig into the plastic. So removing any mould lines really needs the tip of a nice sharp scalpel and plenty of patience.

I was still not entirely happy with the outcome of my removal of the mould lines and so turned to an additional fantastic solution for smoothing things out: Liquid Green Stuff. For such work, this can simply be painted on with a brush (clean well in water afterwards!) over any moulding indiscretions. It can be applied in a couple of coats and also filed down smoother when dried depending how fancy you want to get. In this case the initial texture created by the brush strokes worked well enough for the surfaces in question: rough stone, bestial fur, aged metal and bone.

The one other matter before undercoating are the holes in the bases, they are slotta bases which are rarely covered or filled by the model which leaves unsightly gaps. I filled this with DAS air dried modelling clay which I had handy, a much more affordable and quicker alternative to green stuff for the simplest of jobs. This was just pushed into the gaps with the help of a flat sculpting tool and left to dry.

Of course, none of this preparation is essential by any means but the more time invested the better the models may look.


Painting

This won't be a labourious step by step painting guide for now but just a snippets of perhaps the more interesting work done.

As always when painting anything as a large set I looked for any predominant colours or textures that appeared across most of the models. In this case with the assortment of skeletons and other deathly visages the bone was my first port of call. By completing this on mass for all models it would keep it very consistent. I also knew this would involve a few stages of dry brushing for that dusty aged bone look so completing this first allowed freedom with the brush without interfering with anything else that may have been painted on the model.

Foundry's Boneyard palette is quite ideal for a lot of bone effects, but I wanted a more neutral tone overall so I swapped the Boneyard Shade with Drab Shade for my base colour.

A quick run down of the stages used:

Drab Shade - Base coat
Boneyard - Heavy dry brush over all the model
Boneyard Light - Targeted dry brush of the highest areas
Boneyard Light - Painted high light for edges


Another texture to complete on mass was the metals I wanted the metals to look a little duller and more aged than normal so I used a dark brown (Bay Brown) and dark bluish grey (Slate Gray Shade) as a base coat for the steel and brass. The metallics were painted patchily over this base coat, to emphasize the old armor, with a far shinier metallic used for specular high lights.


The larger models can easily be daunting and in this set Nocturne and Van Wilder are large beastly figures with a hefty expanse of flesh/fur tone. My method for these types of models, is using a large brush and with a lot of different mixes of paints on my palette, I blend and highlight these areas while wet, which is easier than you might expect - don't be afraid to just go for it! All too often if you try to paint these areas with layered highlights glaring brush strokes will appear, which is not the look I was after. Plus you can work quicker and more freely with subtle mixes of colour over still wet coats of paint for an agreeable, and in this case, a supernatural/deathly effect.


"He looks like he's bowling" - Mrs MK

You may be starting to see the colour motif I incorporated throughout this set. From looking at the box and card art there are a lot of colours with glowing purples, greens and oranges. I quickly decided to minimize this for a far more coherent and distinctive look so this purple and blue scheme was born and carried through all of the evil minions. From glowing blue eyes, gems, and candles to blue patterns and even frogs. This theme is only really broken by the pumpkin, though I very nearly painted this purple also (the wife persuaded me otherwise!), but it does at least contain a blue candle.

Gruesome enough eyeball I hope.
It may be rude to point, the baron don't care.
Has to be noted that Mrs Minikingdom stepped in to paint the faces on  the witches and their broomcats. To great effect as you can see!
An eye colour change for Van Wilding, there were enough browns on the model already, artistic license ensued.
Brightly coloured frogs are known to be poisonous, beware. Also "Ribbit"
Blue candle glows blue (to be said five times quickly).
The celestial herald definitely the most vibrant model in the set.

I hope you enjoyed this post - this project was a bit of a deviation from the more traditional models I usually paint, but it was fun nonetheless. Look out for a future post on more painted Super Dungeon Models which Emma will be taking on once they arrive!

Friday, April 26, 2013

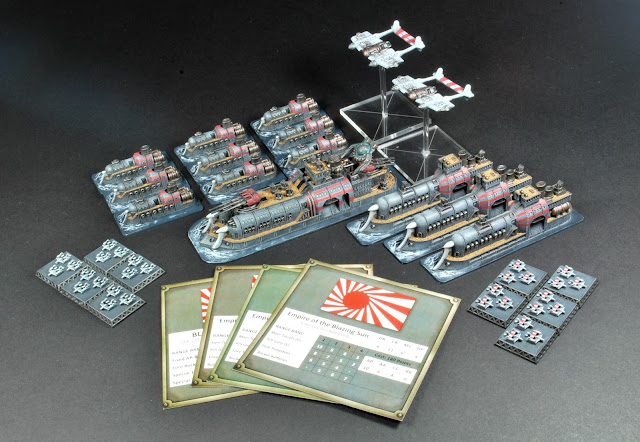
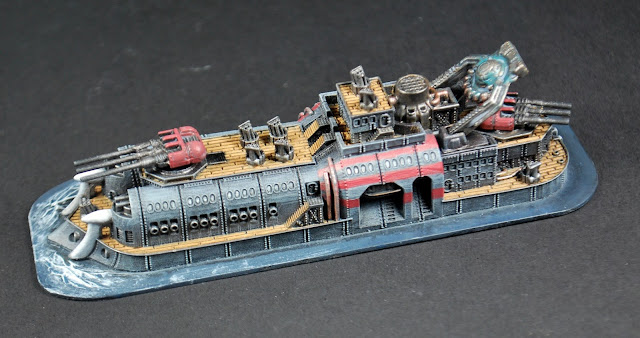
Dystopian Wars - Completed Naval Battle Group, Empire of the Blazing Sun

Next up the Japanese. I finally decided on the sun beam markings I wanted to use. It uses a more subdued red colour than perhaps usual (Madder Red from Wargames Foundry) but this complimented the hull and gives a sufficient flash of colour. The three beam motif was carried over to the air units as was the white of the ship prows to give the air force a scheme of their own while still unifying the whole force.

Unleash the pictures!


Thursday, April 25, 2013

Ramblings of Mrs MiniKingdom


I’m not entirely sure why I decided to start painting minis. Granted, I've always had a bit of a creative streak and painting minis was something that only Jay did, but over the years I guess his passion for this hobby (which is now growing into a small mini business)  has slowly, but surely, wormed its way into my life.  Plus, it looked like a lot of fun!

So, I got myself set up on another desk in what we call the “studio” room and started to paint... more on that in a moment. However, I did feel a bit guilty about taking over Jay’s little sanctuary (a nice quiet place sans nagging wife) and I think it was a bit of a shock for him. Also, it may not have helped that I rearranged and organised the place a little and demanded we do a stock check of all the models/bits etc that Jay has accumulated over the years. He was reluctant at first of course, but it was definitely worth it – we unearthed a long list of cool stuff that is just begging to be painted!

Now, here’s where I confess; I have painted minis before and failed (to complete). I tried my hand at it not long after we got married but got quickly bored with it – I put this mainly down to me not being in the right head space for it at the time... and maybe the crappy uninspiring model. But, anyhoo, now is a different time and I’m full to the brim with ideas and can’t wait to paint.

My first lot of models that I started and finished last week were a unit of High Elf archers. These were pretty fun to paint, I even went as far as naming a couple of them – especially the ones that gave me trouble; don’t you just hate tight, inaccessible parts of a model?! Yeah Jerry I’m talking about you...they drove me mad they did.


Frank, Roger and Jerry!

But this was all a good learning experience. I got to try different techniques, tried my hand at wet blending and got to know which paints were my friend and which were bloody awful and should be avoided at all costs.  However, although these little dudes were a good starting point I know now that painting multiples, like an army or unit, may not be my forté. For one, even though I’m a newbette, I took way too long to complete them – fussing over every minute detail and going over things many many times. I think my calling in the mini-world will be with painting single characters to a high-ish standard... I suppose though only time (and skill) will tell.

My second project I really enjoyed doing, and this time I decided to focus my efforts on just one model or “little dudes” as I call minis. So, I chose Herald of Vulcanis by Soda Pop Miniatures, a promotional anti-hero for Super Dungeon Explore... which Jay just so happened to get recently (he’s been working on some other SDE models too which he’ll be featuring on the blog soon).


Now, this little dude is so super cute (god I sound like a right girl don’t I?)! Plus he’s got this whole Roman/Spartan thing going on which I love and which you don’t see too much of.

Sidenote: If you’re a Kickstarter fan you may have come across Arena Rex by Red Republic Games – now those models are to die for! After a lot of persuading (yeah right! Jay was hooked before I was) we pledged a decent sum for Arena Rex... early Christmas pressie you say? Don’t mind if I do. I’m especially looking forward to painting Bjarrhvit, if the artwork is to go by the model is going to be frackin insane!


Anyhoo, back to little Lord Vulcy. He was great to paint and pretty easy and I was able to take as much time as I wanted with him. He has a couple of cool little details that I made features of like the symbol on his shield – I washed it with bright red, so it would sink into the crack of the symbol and later painted around it with a gold/bronze mix. Then was his skirt and all the gold embroidery on that – I tell you, I got to know my 00 brush rather well for that task! I also made a feature out of the base. I didn't want it to be plain and so I gave it a molten lava effect. I also made sure that his eyes stood out, the colours I used also echo the colours I used on the base - black for the whites of the eyes and then red, orange and yellow layered on top, resulting in a striking deathly stare.


All in all Herald of Vulcanis is not a bad mini, the only real downside to the model is the material it’s made from; it’s very squishy and waxy but I guess for what it is it’s not too bad, after all it's meant to be a boardgame miniature.


But now that he’s done, I’m not sure what’s next. I do have some Warmachine models incoming but they may take a while to arrive, so I guess I’ll have to dig into our stock and find something shiny to paint... either way you ain't heard the last of me! :)

Wednesday, April 24, 2013

Dystopian Wars - Completed Naval Battle Group, Prussian

Here we have the first of two Dystopian fleets I have been working on. Hopefully these can find a good home.

Since my last update the Prussian fleet only needed it's tiny flyer completed, I have been painted the 10 tiny flyers with two different wing patterns to help distinguish them on the table. I was tempted to paint a single Red Baron fighter as befitting the Prussian's but have resisted, for the moment.

When black washing the sides of the bases I dabbed the wash randomly on the blue surface previously painted. The intentional water marking this has left behind simulates a birds eye view of a seascape. Simulate is perhaps a stretch but it certainly gives a subtle and appropriate texturing that may not have been paint-able. The wing markings are a red or black line painted down the center of a wider white line. The wider white line is not too difficult to paint with the drag of a #2 paint brush and carefully painting down the center of this with a finer brush gives you the three stripes.

Prussian Black Wing Squadron

Prussian Red Wing Squadron
Here are all the updated pictures of the rest of the Prussians that have been featured previously on the blog. The work done on them includes; decking, windows, brass pipes, subtle blue glow for the Tesla batteries, scorching on the weapons and barrels, freehand markings, and sculpted bow wakes. The free hand stripes may be hard work but are definitely worth it I think. I can only hope I am commissioned to paint other vessels from the Prussian Empire so as to see this colour scheme put to more work.


Thursday, April 18, 2013

Warmachine eBay items


Finally got my new lamps today and have been redoing a couple of the eBay photos for better clarity. Enjoy (and yes photography is still my nemesis!). Click to enlarge.

5 Painted Warmachine Menoth Exemplar Bastions


...a wild Ork appears